With four kids to get out the door to school every morning, the smallest hiccup can turn the morning rush into a train wreck. Four sets of homework to pack in backpacks, four heads that need cute hairstyles, four sets of (hopefully matching) socks to find in a mountain of laundry. One misplaced piece of homework, or one head of bedhair that won’t cooperate, or one missing sock eaten by the dryer – can derail the whole morning.
Which is why lunch has to be simple.
I’m constantly on the lookout for quick and healthy lunch solutions for my kids. But with four kids, our lunches also need to be affordable. Not to mention lunches that the kids will actually eat!
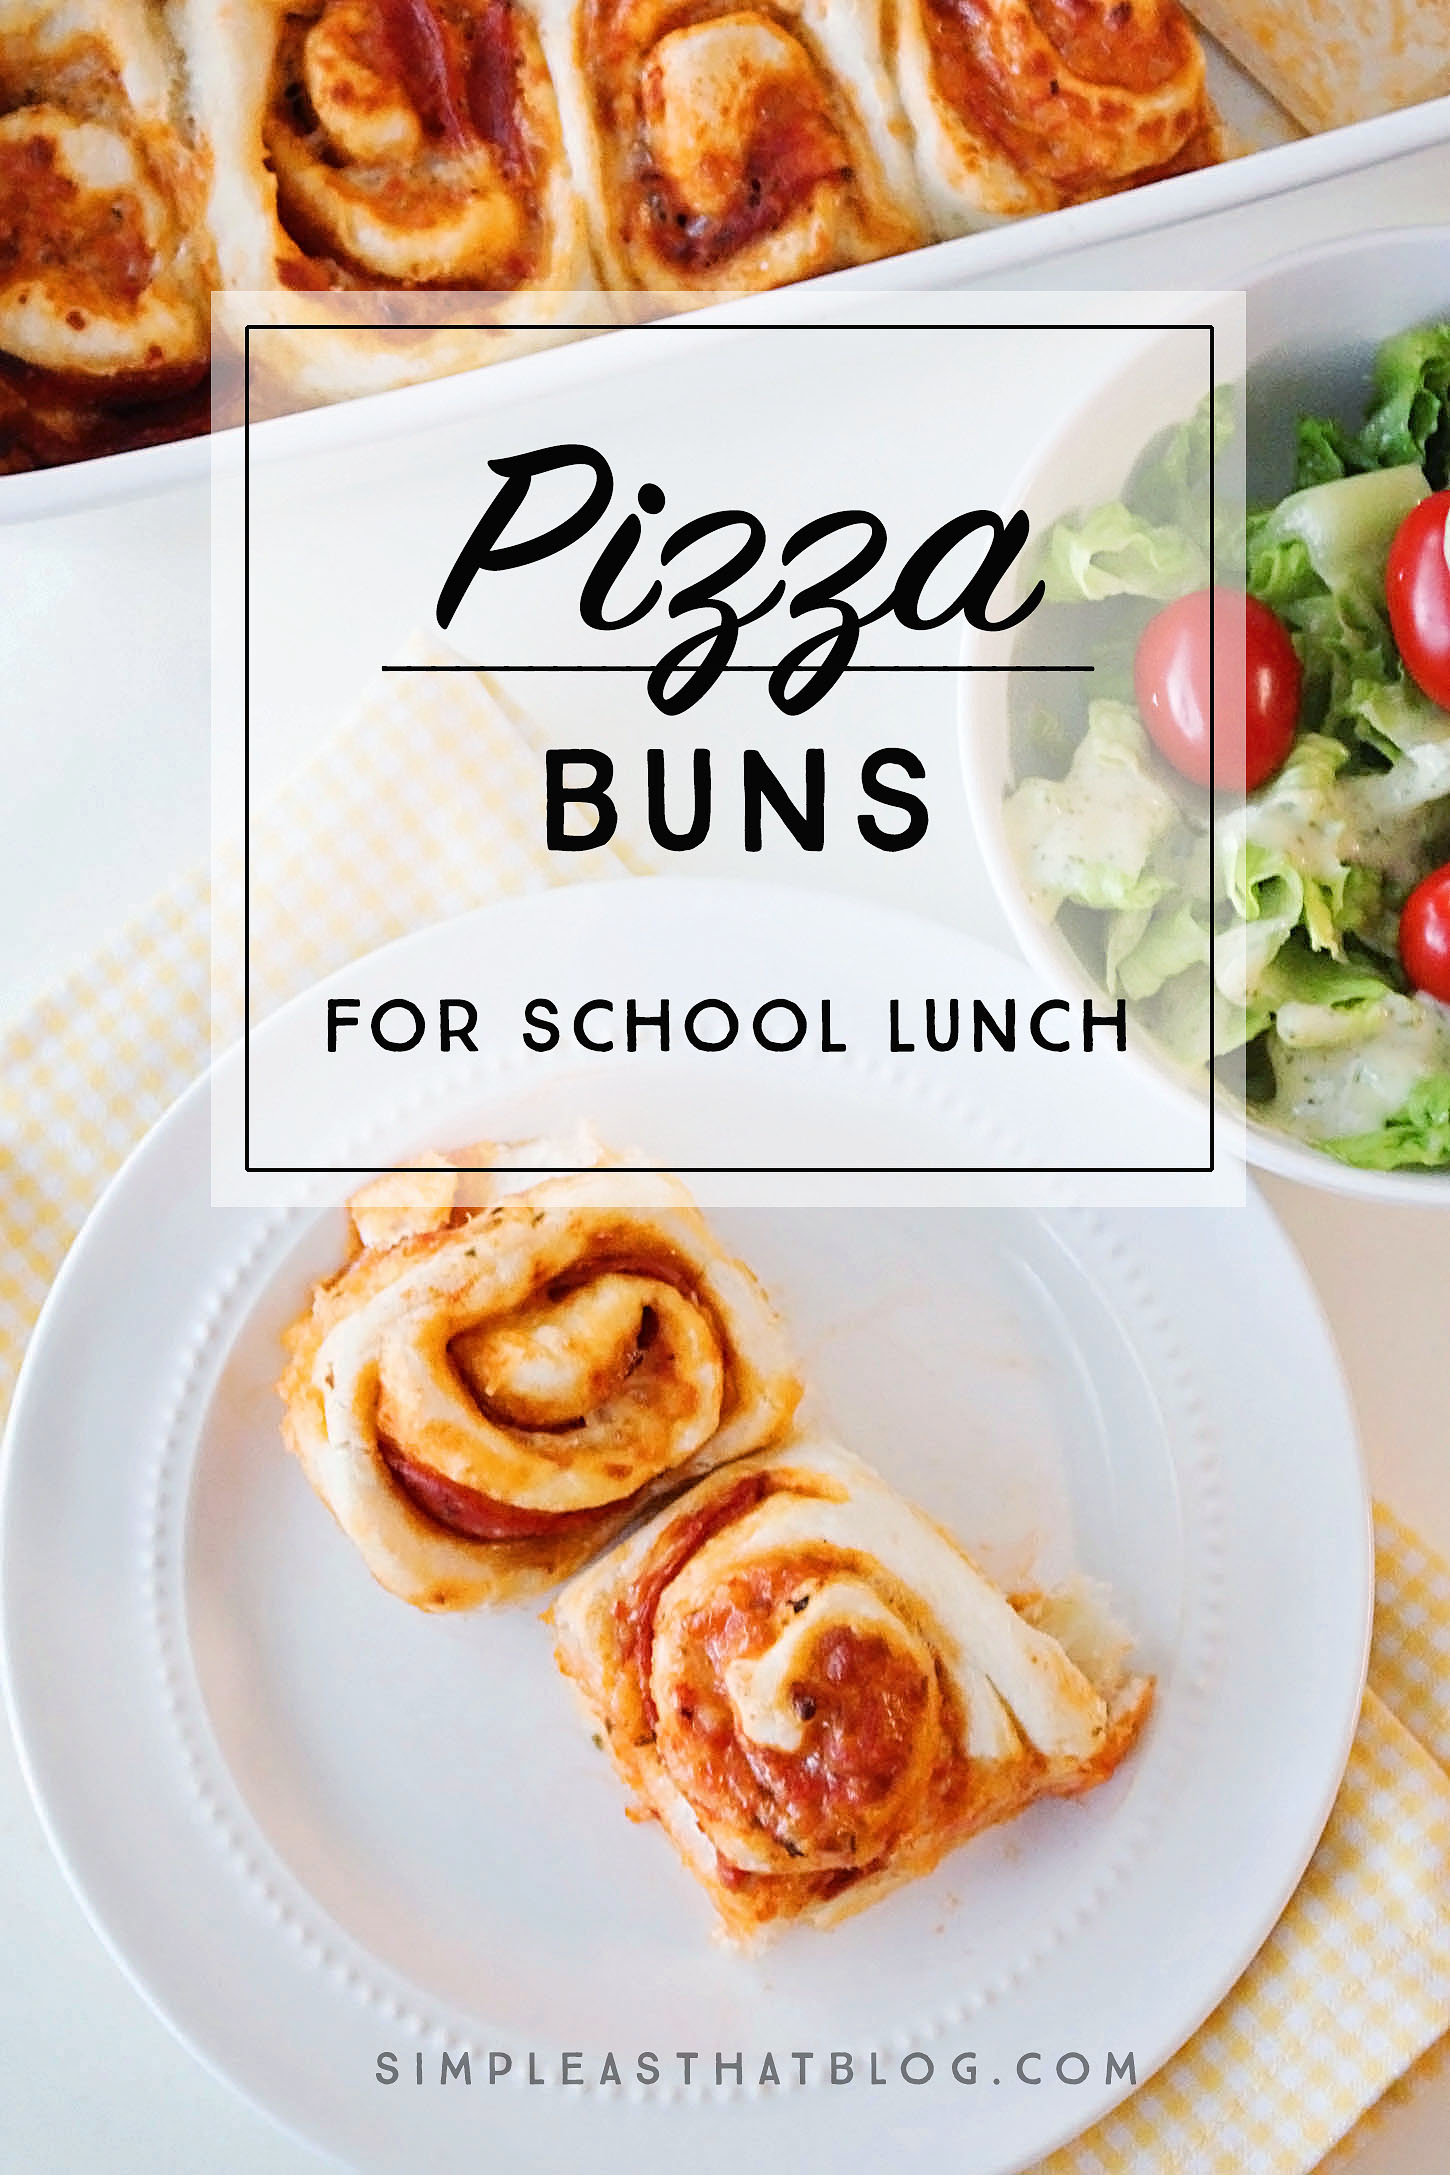
Why Pizza Buns Are the Perfect Lunch for Kids
A few years ago, my sister-in-law shared a pizza bun recipe, and it’s become one of our top go-to lunch options. Here’s why:
- Kids love pizza!
- Pizza buns are an easy way to add a serving of meat and dairy to your kid’s lunch
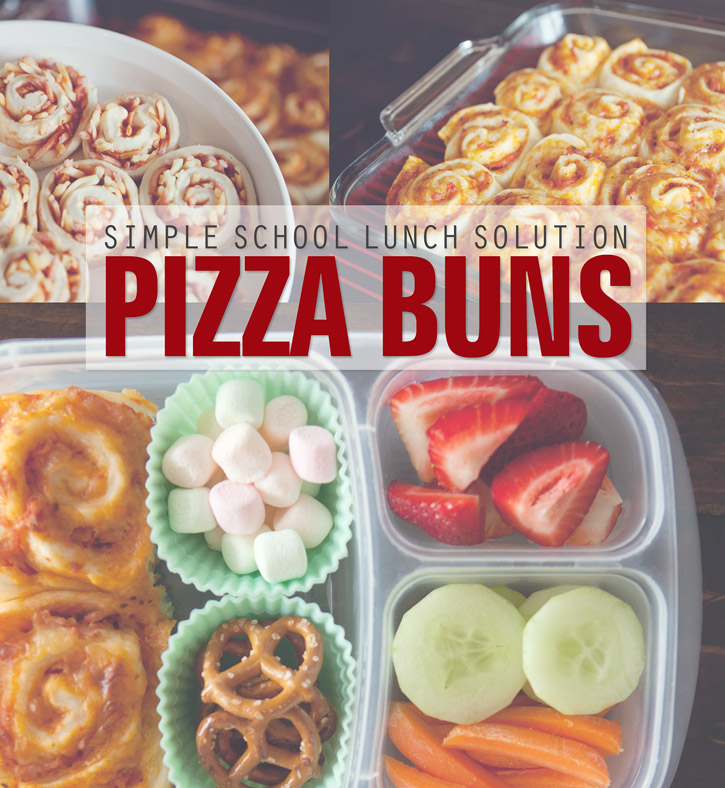
- I can make one batch during the weekend, store them in freezer baggie in batches of two, then pop them in the freezer to have them on hand for the mornings where we’re running behind schedule and need a quick lunch option
You’ll find the recipe below along with a quick how-to, a printable version of the recipe, and a list of some of my favourite online resources for kid friends {and healthy} meal ideas.
Note: I’ve tried a few different dough recipes, but this no-fuss dough recipe from Our Best Bites is the clear winner for this lunch.
Healthy Eating Starts with a Plan
Taking a few minutes each week to plan your meals can go a long way in helping you save money, time and eat healthier!
Download our free Printable Meal Planner here.
Homemade Pizza Buns
1 1/2 cups warm water
1 Tbsp sugar
1 Tbsp yeast
1/2 tsp salt
3-4 1/2 cups flour
Instructions
In a bowl combine water, sugar and yeast. I usually throw these ingredients directly into my Bosch mixer. Let stand for about 10 minutes.
Add salt. Stir. Add half your flour and mix well. Gradually add more flour until dough pulls away from edges of the bowl when mixing and it isn’t sticky.
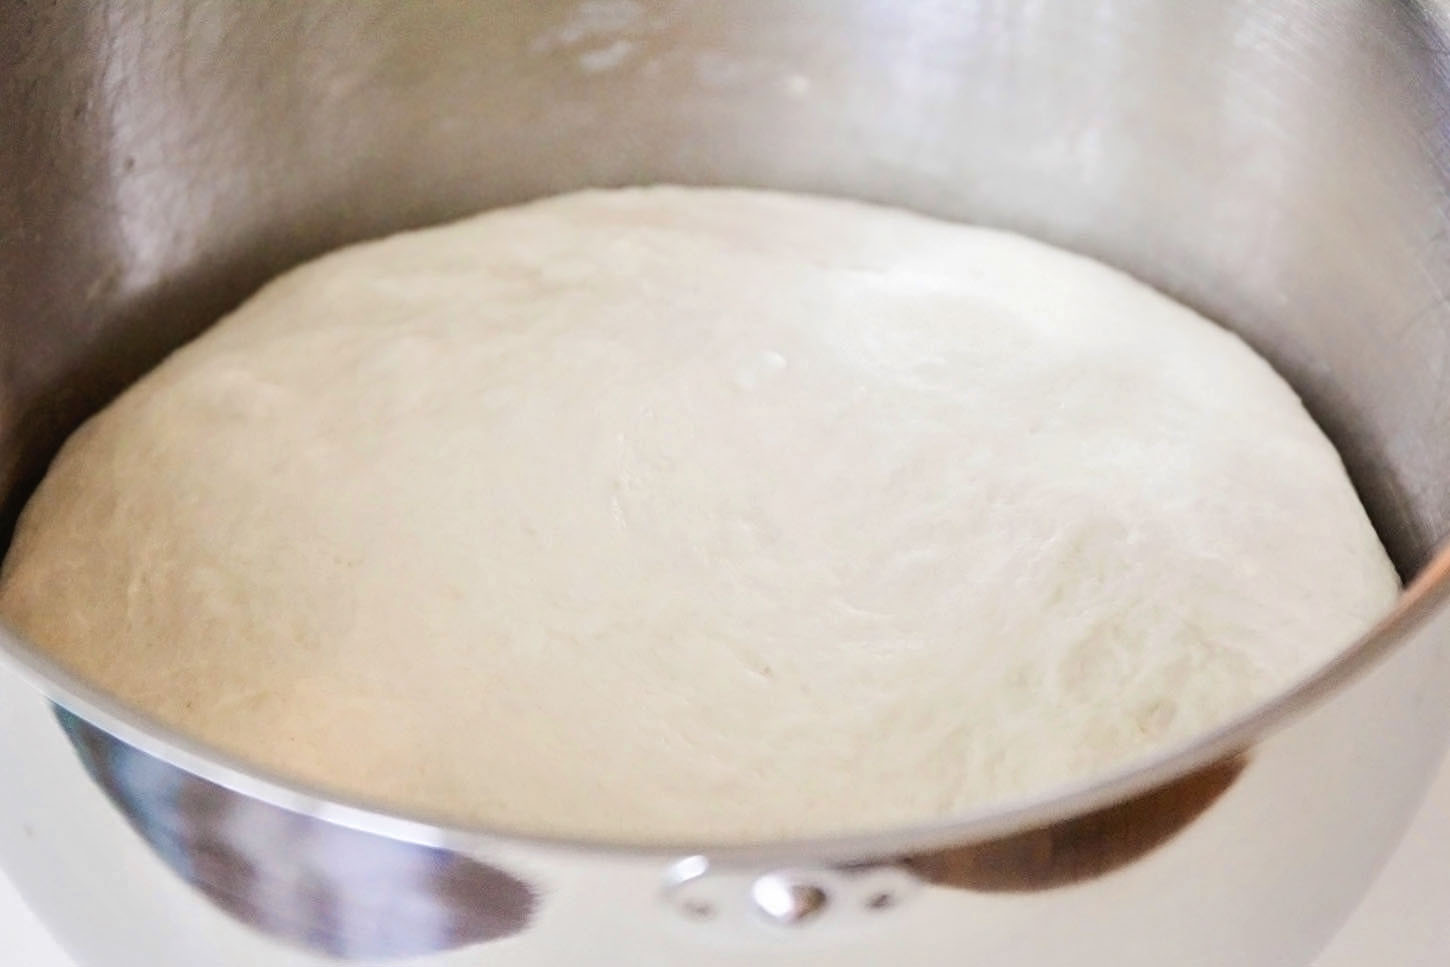
Place dough in a lightly greased bowl, cover and let rise for 45 minutes or until double in size. Remove dough from bowl. Separate into three equal parts.
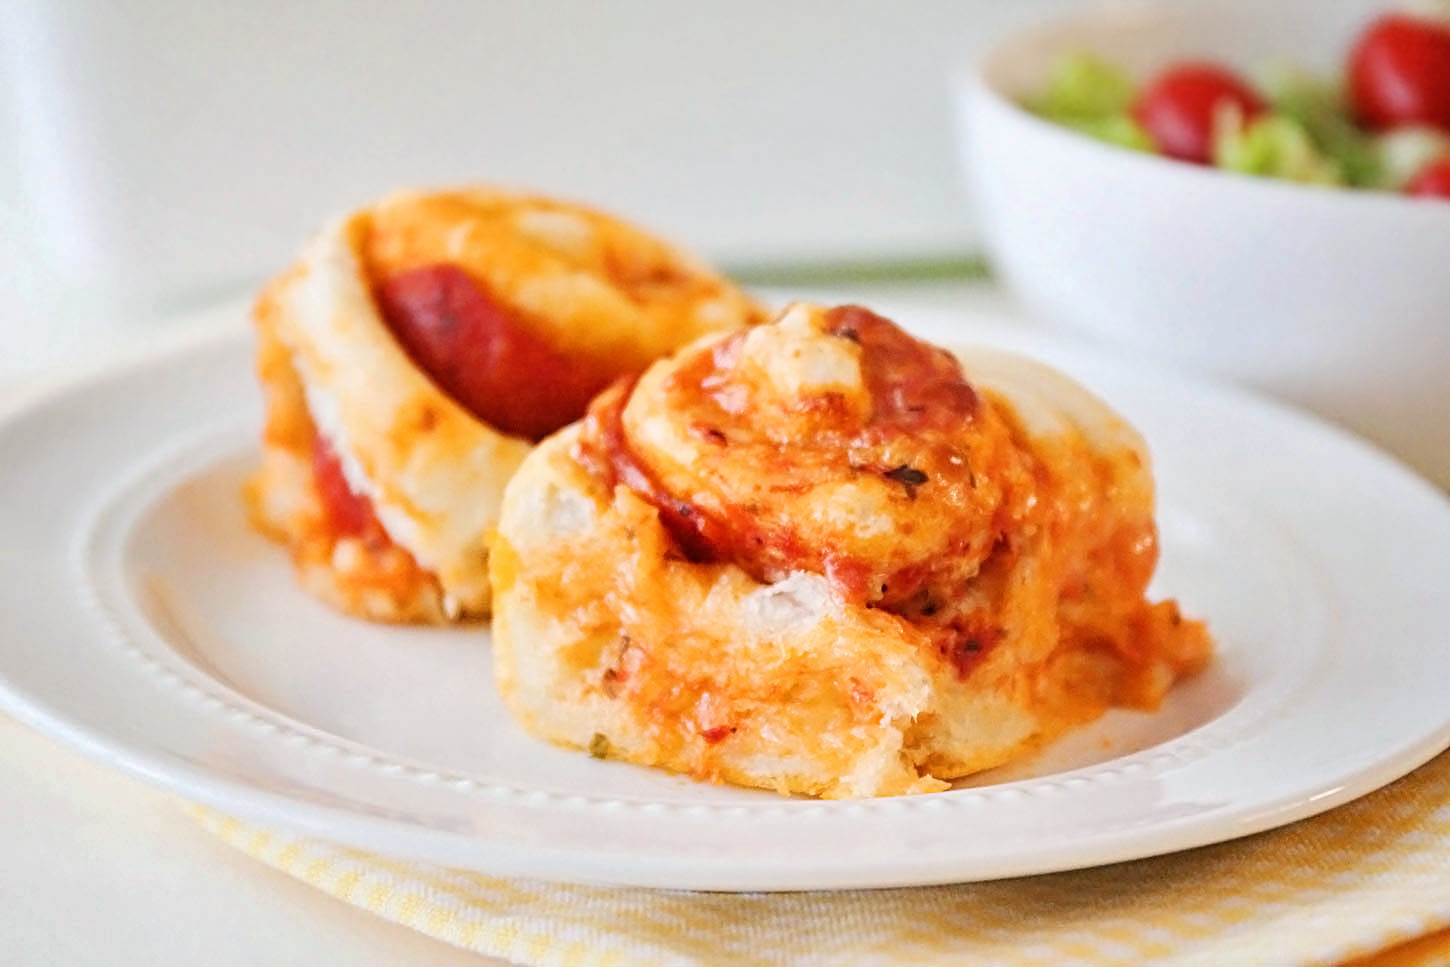
Prepare pizza ingredients. Pepperoni, mozzarella cheese, pizza sauce or whatever other toppings you’d like to us.
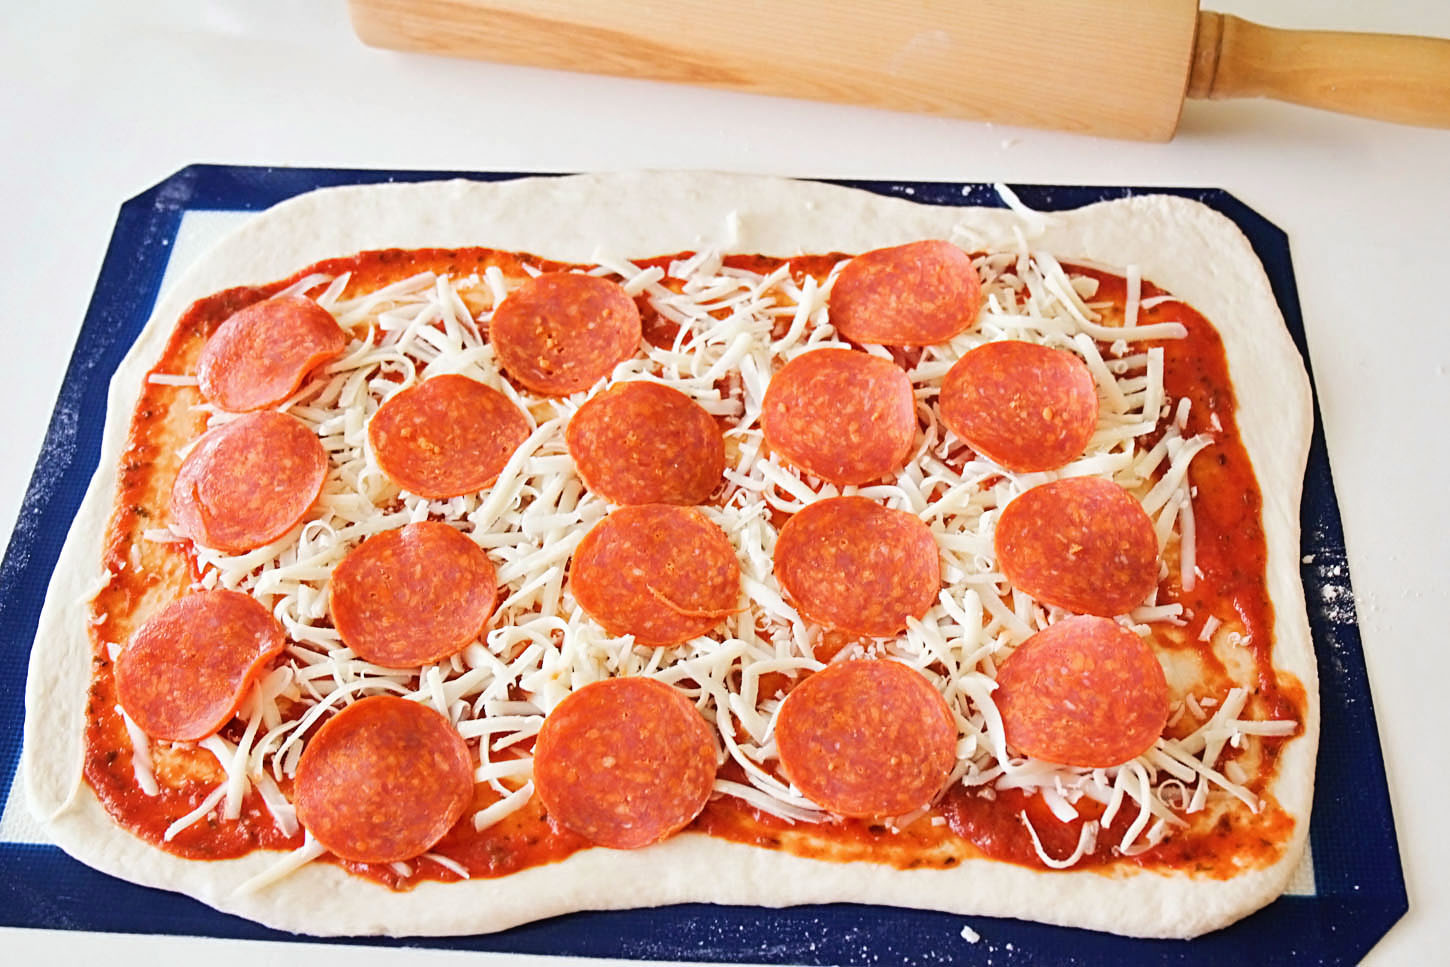
Take one portion of the dough and roll out on a lightly greased or floured surface. I typically spray my working surface with a little cooking spray or use a small amount of oil to keep the dough from sticking. Roll dough into a long skinny rectangle as you would for cinnamon rolls.
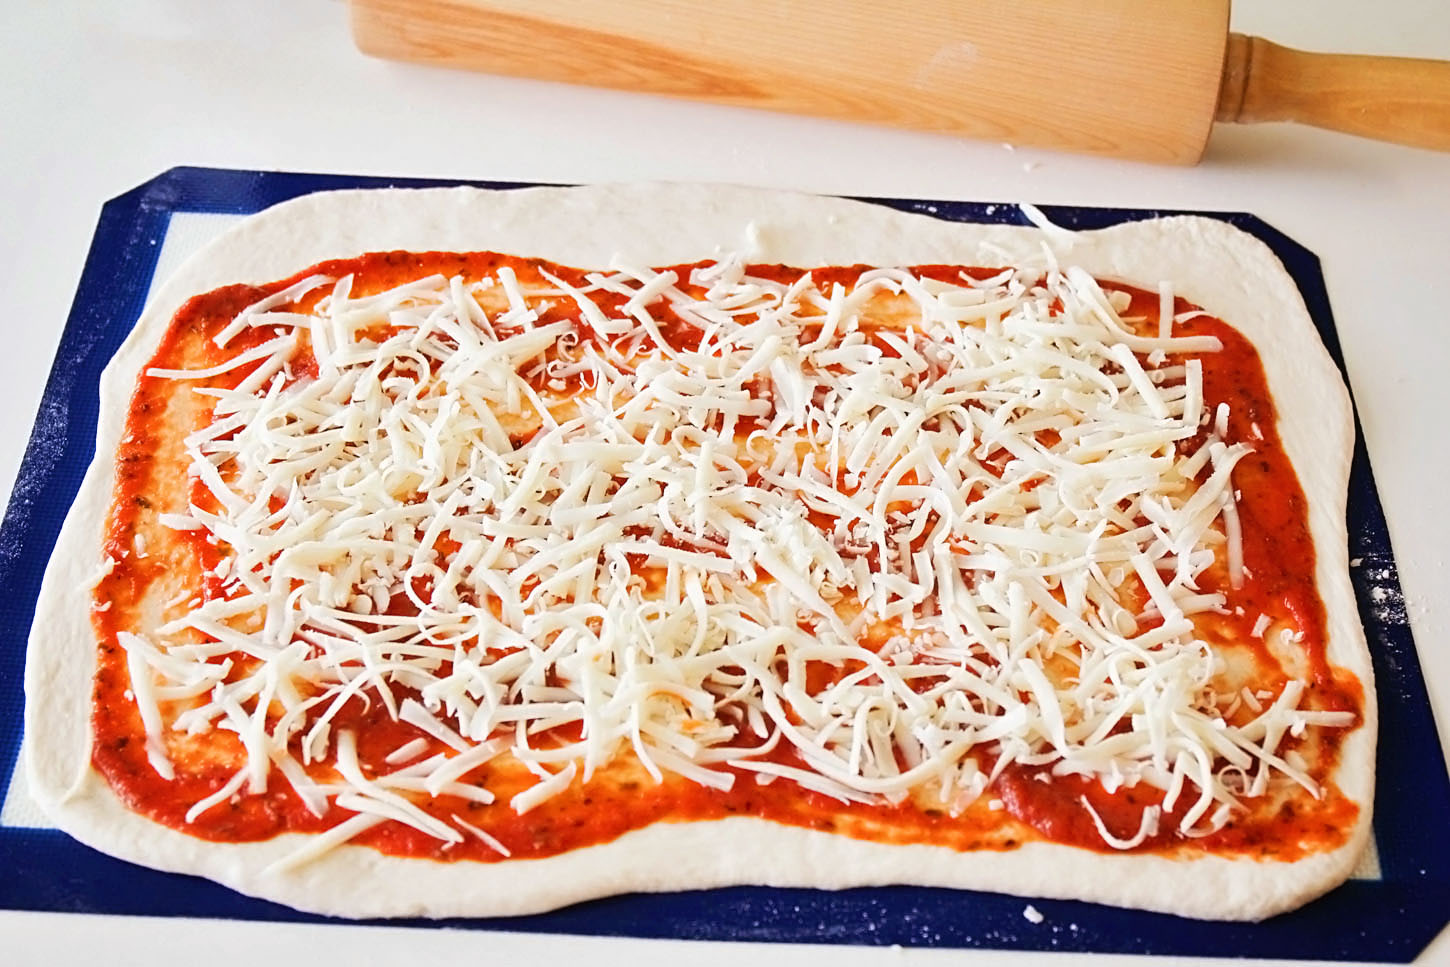
Once your dough is rolled, you can begin layering your pizza ingredients starting with the sauce. Spread sauce over the dough leaving the very edge of one of the long sides of the rectangle free from sauce so the edge will seal when rolled up. Layer meat, cheese and any other pizza toppings you’d like.
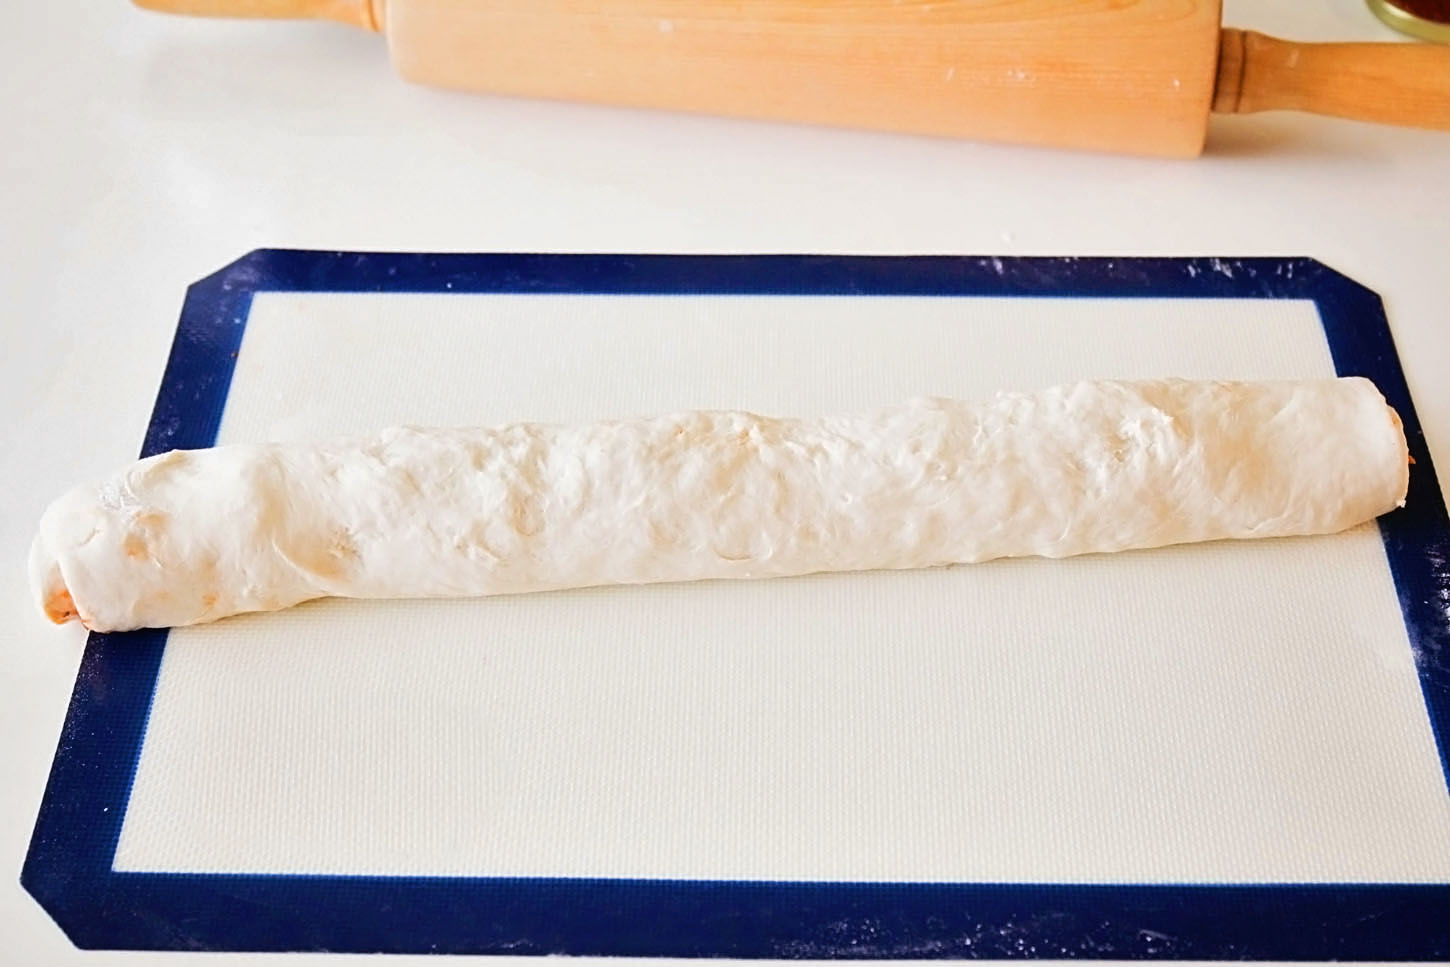
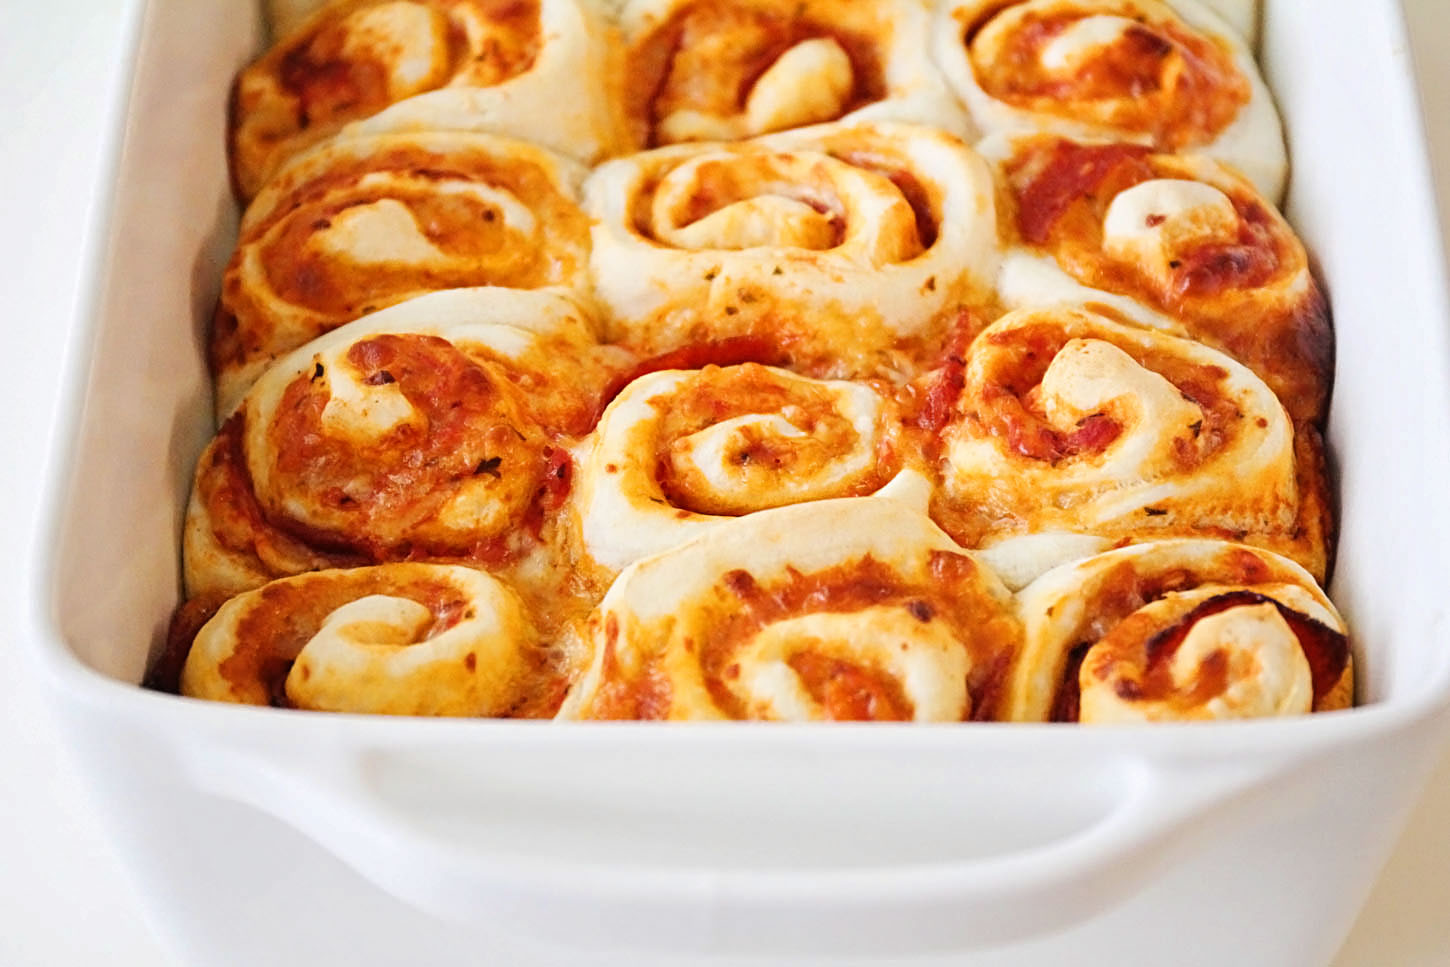
After all your pizza toppings have been added, begin rolling up the dough starting at the long side of the rectangle where the sauce is all the way to the edge – you want to leave that sauce free edge to be rolled up last. Roll all the way up and then pinch the edges to seal. Now using a small length of dental floss, slice off equal sized rolls.

This recipe makes a large batch and what I do as soon as they’ve cooled is package them in freezer ziploks in quantities of two in the freezer. Having them on hand on those days when we need to grab lunch and go is the best thing ever!
I typically put the buns in the kids school lunches frozen, that way the meat and cheese stays chilled until lunch time. I pack all their lunches in these 3 compartment containers from Easy Lunchboxes. I absolutely love these containers! I add a few other healthy things to their lunch along with a little treat then put the containers inside their insulated lunch bags along with a freezer pack and that’s it!
This recipe may not help you find that one striped sock that mysteriously disappeared in the dryer, but it will help you pack quick and healthy lunches your kids will love.
- Dough:
- 1½ cups warm water
- 1 Tbsp sugar
- 1 Tbsp yeast
- ½ tsp salt
- 3-4½ cups flour
- In a bowl combine water, sugar and yeast. Let stand for about 10 minutes.
- Add salt. Stir. Add half your flour and mix well. Gradually add more flour until dough pulls away from edges of the bowl when mixing and it isn’t sticky.
- Place dough in a lightly greased bowl, cover and let rise for 45 minutes or until double in size. Remove dough from bowl. Separate into three equal parts.
- Prepare your pizza ingredients. For the pizza buns pictured we use garlic sausage, mozzarella cheese and pizza sauce, but anything goes! This is going to be just like making cinnamon buns from here on out – only with pizza fixings!
- Take one portion of the dough and roll out on a lightly greased or floured surface. I typically spray my working surface with a little cooking spray or use a small amount of oil to keep the dough from sticking. Roll dough into a long skinny rectangle as you would for cinnamon rolls.
- Once your dough is rolled, you can begin layering your pizza ingredients starting with the sauce. Spread sauce over the dough leaving the very edge of one of the long sides of the rectangle free from sauce so the edge will seal when rolled up. Layer meat, cheese and any other pizza toppings you’d like.
- After all your pizza toppings have been added, begin rolling up the dough starting at the long side of the rectangle where the sauce is all the way to the edge – you want to leave that sauce free edge to be rolled up last. Roll all the way up and then pinch the edges to seal. Now using a small length of dental floss, slice off equal sized rolls.
- Place rolls in a greased baking dish.
- Cover and allow buns to rise 30 minutes.
- Bake in the oven at 350 for 25 – 30 minutes or until golden brown.
If you liked this post you might also enjoy…
- A Weeks Worth of Healthy, School Lunch Ideas
- Family Friendly On-the-Go Lunch Ideas
- Simple Back to School Photo Tips
- Budget Friendly Family Command Centre and Homework Station
- Staying organized throughout the school year: Printable Chore charts

Latest posts by Rebecca (see all)
- Printable 2023 Calendar - Monday, December 5, 2022
- SMART Goal Setting Bookmarks - Sunday, June 12, 2022
- Free Printable 2022 Calendar - Thursday, September 9, 2021

Those look really yummy. What a pretty lunch!
Great idea Rebecca, thanks!
And if you have time, look here:
http://crafttime.blogspot.it/2013/02/1-pin-al-mese-febbraio.html
I talk about you 🙂
Yum. Love the idea. We use the same containers for lunch. I also use muffin liners for treats and other goodies. I like the idea of just pulling them out of the freezer. thanks for sharing.
I love this recipe! My son has a dairy allergy, so I will simply omit the cheese. He will love it, and it will expand on his penchant for eating the same 5 lunches every week. For us, celery and peanut butter is a good go-to when we are short on time. I keep some celery cut up and quickly drop them into his reusable container with a center well. I can’t wait to try this!
Have you tried the Daiya, dairy free cheese? I have a dairy free family friend and he enjoys it.
So so smart! Can’t wait to try these!
These are adorable, I love the photography. Makes me want to have little ones to pack cute lunches for, I suppose husband will have to do for now!
Looks wonderful!
Love your well rounded and kid friendly lunch!!! Mmm. Pizza rolls. How fun!
Hi Rebecca! Wow – Thank you so much for featuring your amazing pizza buns in my EasyLunchboxes! Of course, I’ll be sharing them with my lunch-packing community now 🙂 They’re too FAB! And good news – I am working to get my EasyLunchboxes up on Amazon.ca and Canadians will be able to purchase them with FREE shipping! Should be live within about 3-4 weeks 🙂 Your blog is GORGEOUS. Thank you again Rebecca! – K.
Thank you for the recipe ! I made these today and they are delicious! My husband raved for about 20 minutes while he demolished 6 of them. 😉
I keep forgetting to tell you when I see you so I’m telling you HERE – Brody commented today that one of his lunch helpers had “marshmallows” in their lunch and how cool he thought that was. I knew Emily was one of his helpers, so I figured that picture above is her lunch?!
I’m definitely going to try those pizza buns. I’ve been looking for a recipe! Thanks.
They look amazing!!!
These pizza buns look delicious and so easy to pack in a lunch! And I’m very excited to read in the comments that they will be coming to Amazon.ca in a few weeks! Whoop! As soon as they are in I’m going to be purchasing some!
This is a superb lunch for my little Alisa. It looks so healthy. Thanks for the recipe.
Love your lunches and especially the pizza buns! Cute idea. I pinned it to my Lovable Lunches board and am following your board now too!
I have loved your blog for such a long time and finally had to make a comment. I think my boys will love these. Thanks for sharing all your great ideas and knowledge!
Hi
What a great recipe! By any chance can you use whole wheat flour?
Yes! I’m going to jump in and say that of course you can make them with whole wheat. I haven’t had “white death” (white flour) in my house for about 10 years. I have never found a recipe that couldn’t be made with whole wheat as opposed white flour. It tastes better and is MUCH healthier (not only is there more fibre but the original nutrition is intact and doesn’t need to be added back in…ie “enriched”). You might need to use just a tiny bit less flour but today’s whole wheat flour is so finely milled that you can probably just go ahead and substitute an equal amount. I hope perhaps the creator of this recipe will switch, too! Once you eliminate the white stuff from your house, your family will get used to the better versions of your favourites!
I would even make these for dinner. I have picky eaters in my family and I bet this would be gobbled up!
How many pizza buns does this recipe make for you?
Oh those look great! My older kids would love them too! Thanks for sharing!
These look so yummy! I KNOW my kids would love them!
Are they thawed by the time the kids have lunch? That is my only concern. My little girl will be kindergarten so they will be eating first… but I know that she would love these!
Hello @Christina, my kids said their pizza buns have always been fully thawed when they ate them for lunch at noon. 🙂
My son is also in kindergarden and they don’t have a microwave. Are these good once thawed?
My kids have never warmed them up at school. They love them!
These look perfect for my brand new first grader. But I have possibly a silly questions, are they served cold? He won’t have access to a microwave so I’m looking for ideas other than sandwiches.
Hi, for another idea you could.. make a wrap with cream cheese and sandwich meat and roll it tight and cut into small pieces. My toddler likes that. U can use cheese sslics too and any meat
These look great! Do you serve these cold at lunch time? My first grader will not have access to a microwave so I’ve been looking for ides. Thanks!
Hello @Crystal….my kids eat them cold and like it. My oldest daughter actually prefers them that way. 🙂
Great idea!! Thanks for sharing.
We love Easy Lunchboxes, too. I’m always looking for new lunch ideas, and these look fabulous!
I’ve made these several times for my kids they love them they just keep asking me to make them five stars.
Trying the today! I noticed that you didn’t have any flour on the surface you were rolling on. How was is possible? I’m waiting for mine to come out of the oven and I must have used too much flour because I can see it on the rolls.
When rolling dough I always use a little bit of oil on my hands and counter surface Ashley…works great and you don’t get all that extra flour! 🙂
Hi, I love love love this idea for lunches! I was just wondering, can you give me a better idea of how big you rolled the dough out to be? Rolling things out without dimensions makes me nervous
Oh boy….I’ve always just eyeballed it Lotte! 😉 Maybe as big as a 9X13 in pan or a bit bigger. The rectangular shape is more important than anything. The bigger the rectangle the bigger your pizza buns will be. 🙂
How does the dough turnout in the middle of the roll? We’re not big fans of doughy centers. Even in cinnamon buns.
I make my buns on the smaller side and I’ve never run into doughy centres – I hate that too! 🙂
Which type of flour would work best to turn this into a gluten-free recipe?
I’m not too sure Kelly, sorry I’m no help!
just a question …. I don’t have a mixer that can mix dough …. so can I use just my hands or my bread machine ?
Thanks for sharing this recipe! I’m so excited to try these for my hubby’s lunches.
I have a couple questions though. I assume the yeast you’re using is the quick rise yeast. Is that right?
And the meat, do you pre-cook it, or will it cook through in the oven? I’m squimish about serving undercooked meat, but rubbery overcooked meat isn’t that appealing either…
Hello Dima! It’s quick rise yeast that I use and the meat is already pre-cooked when purchased. 🙂
Hello!
My name is Martina and I have read your blog and I really liked your recipes! I work for a website called myTaste.com and I would love for you to join us!
http://www.mytaste.com is a search engine that collects food blogs. We already have over 3000 blogs and if you join us you will take benefit from the traffic that we are sending to your blog.
Add our widget and hopefully with your recipes your blog will be on the top of the food blogs list!
If you have any questions please don’t hesitate to contact me at [email protected]
To join myTaste, just go to http://www.mytaste.com/add-your-food-blog
Best regards, Martina
mytaste.com
I love your blog! I found it searching for back to school photo ideas!:) Great job.
Thank you so much for stopping by Erin! 🙂
Yum!! Made these for our lunch at home today. Made then with 100% whole wheat and used a veggie loaded tomatoe sauce (basically pureed spaghetti sauce) with some extra basil and oregano. Very delicious I look forward to adding these to the lunchbox rotation.
Hi there I was wondering if I go the lazy route and use pre-made pizza dough if I would still need to let it rise 30min before cooking.
Thanks
I’d go by the packaging directions on the pre-made dough Emily. 🙂
Made the Pizza Buns today to feed my 9 year old & his friend as an after school snack. OMG, the boys just gobbled them up! Kid Tested & Approved! I am so excited and wondering what other combinations I could use! THANK YOU! I am a little apprehensive about freezing them for his school lunches because his lunch period is at 11 am (school begins at 8:15 am) and I am not sure if they will be defrosted in time.
My kids have never complained that theirs were still frozen and I know my kindergartener had an early lunch hour Deb. So glad you (and your boys!) liked the pizza buns! 🙂
LOVE this recipe!! Thanks so much for sharing! My kindergartener will be a happy kiddo at lunchtime tomorrow! 🙂
Enjoy! This reminds me, I need to make another batch for my kiddos. 🙂
Love the pizza bun idea! I would add though that it takes a long time, plan on the entire evening, but the good part is it will cover several lunches over time. I would suggest refrigerating dough a few minutes before rolling and flouring the surface to avoid sticky dough. Mine was too warm on the first third, too thin, and they would not stand up or form a round bun shape. After learning that lesson, it was better. I also did not roll dough as thin, used less toppings and rolled with a slight pick up method to keep toppings from pushing to edge. I then cut them nearly an inch and a half thick to help them stand up. Looking forward to these and hoping next time with these adjustments they will look like yours! Yours are beautiful!
Super! i have the pizza in the oven at this moment 🙂
Is there anyway to make the pizza buns gluten free?
Any GF flour should do it. I use Bob’s Red Mill all purpose. Works great and no weird after taste.
Thank you so much! Have made this a number of times and kids go ga-ga over them, fresh from the oven and frozen for lunch the next day. Both work beautifully and have made last minute lunch-making a breeze! Especially if combined with previously frozen mini-muffins. 😉
Can you post a link to the original sour cream dough?
Hi there,
Your blog is gorgeous. I am visiting today for the first time and my rolls are rising as my oven preheats! My question is, what size of pans do you fill for one recipe? I see in the one photo you had 3 glass pans, are you doubling the recipe? How thick do you slice the rolls?
I usually make one batch Cindy and use 2 9×13 pans. When I slice them they’re about 1 inch thick. Hope that helps! Thank you so much for stopping by! 🙂
I tried these today but had a bit of a struggle with knowing the size! In the end I had made them too tall, say about 2.5 inches and they took forever to cook. I ended up having to take them out of the pan, turn them upside-down onto a baking tray and bake for a little longer just to get the bottom cooked.
Anyway after all that they were DELISCIOUS!!!! I will definitely make them again but now I know that the three balls of dough should give me roughly 48 – 56 scrolls instead of 24. (Is there anyway to make an amendment to your original post to give an idea as to how big you roll your dough and what size roughly you cut them into? Would have saved me a lot of time 🙂 thanks for the recipe
Question – should these be reheated, or are they good at room temp (no micro at my kid’s school)?
My kids eat them at room temperature all the time. 🙂
Thanks for the recipe! My hubby gobbles these up everytime I make them (I have a constant supply in my freezer).
These are so great for kids lunches! I have made them with various fillings…veggies, chicken, etc.
I’m so glad your family likes them as much as we do Candace! 🙂
I tried this recipe. Yummy yummy. All my family love it. I don’t make pizza anymore. Mini buns are like snacks or you can eat as a lunch or dinner with a salad.